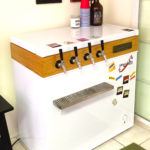
What’s a keezer?
Keezer (noun): a freezer that has been modified to serve beer from a keg
Every home brewer at some point as given a lot of though to tapping a keg at home and pour yourself beer? I certainly did when a few years back I built our first Keezer. However, we foolish didn’t bring it with us when we moved! But every setback is a new opportunity and here we get to build a new keezer and for me the building is half the fun!
You can read all about the process and steps on the article at ageekdad.com, we won’t go in to that in this post where I’ll cover what I did differently.
While the total cost each project was about $1000 there were some big differences between them.
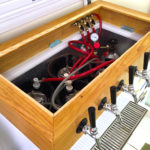
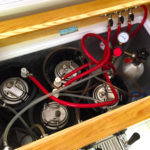
- In 2012 we built a 3 tap system, in 2015 we build a four tap system. This added an extra set of lines, taps, and a keg.
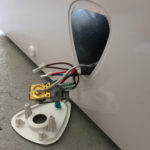
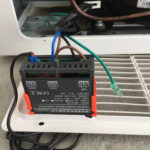
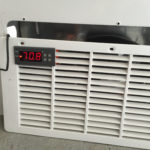
- The price of temperature controllers have plummeted in the last 3 years.
- We used chrome plated brass instead of stainless steel to save on the cost.
- Passed on the bottle opener and cap catcher this time, we rarely used it.
- And the biggest difference of all in 2012 we built it in Atlanta, GA and in 2015 we built it in Bermuda!
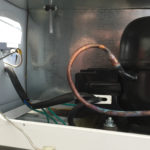
To start we had to get a new, or used, chest freezer to base the new keezer on. Unfortunately, unlike our first build it seems no one makes black chest freezers anymore so we settled for a white one. Actually two, we bought a used one from a friend but it turned out to be too small so we bought a new one as well. Don’t worry the first one will become a fermentation chamber but that’s another post.
The rest of the parts were purchased at home-brew shops in the US and purchased locally at Gorhams.

One of the trickiest issues is getting the beer to pour right. Not too slow but not foamy either. This is a very difficult issue that requires a lot of complex math that crosses both liquid and gas handling equations that are impacted by:
- The diameter and material of beer line
- Temperature of the beer
- Alcohol content of the beer
- Tap vertical distance from the keg
- CO2 pressure in the keg
- Flow rate of the beer
Thankfully in the internet age there are many calculators online to solve the problem for you! I used this calculator to help determine the line length. It’s important to give this a lot of though beforehand or you might be buying new line(s) if you cut yours too short or decide the beer is too warm or cold.
Finally, instead of custom tap handles with chalk or whiteboard surfaces we instead printed our beer labels on magnetic ink jet paper which sticks to the keezer very well. It also lets us put notes (coming soon, still conditioning) and warning labels (high alcohol content)next to each beer. If you’re interested and want to see what where pouring in our new keezer today check this page!